Final Project: Waveform Supremacy and a Splash of SuperCollider

OVERVIEW

The Final Project for CPSC 035 that I completed alongside Ethan Kopf, my partner, is a 3 and a half minute song using MIDI, samples, and even a SuperCollider-generated .wav sample that culminate in a song with lyrics I wrote. It was actually much easier to collaborate on a Waveform project than I thought, being able to email or text the ZIP file whenever necessary. We also tried following the requirements of Waveform Project 2 when creating this song, in order to ensure that we made full use of all we learned about frequency filters and effects plug-ins, along with concepts like gain, mixing, and mastering.

BEGINNING THE PROJECT

We started out by consulting on what type of song we wanted to create, and I had an idea of some kind of base for lyrics we could use in the song. A few days later, I typed them up on a Google Doc. Here they are:

Lyrics

VERSE 1:

When you were falling down, I was there for you, I was there for you

When you were at your lowest point, who was there to guide you back home?

And now, when I’m in the same place, falling down in this deep abyss

Are you gonna be there for me? Are you gonna be there for me?

BRIDGE:

Tired of this trick,

I’m just a doormat to you, I see it now

Tired of being a fool,

When you don’t care about me like that

Why-why-why

Couldn’t you just say that you don’t care about me like that

I’m tired of being a fool, thinking I could get you to love me back

CHORUS:

Instead of leading me on

You don’t return my frequency

All that I gave, there’s nothing to receive

Why do I keep going back when there’s nothing here for me?

I should just move on

From this one-sided love (one-sided love!)

One-sided love (one-sided love)

I’m moving on from this one-sided love

VERSE 2:

I see how you look at the others

I know you would never see me

In that same way

Just tell me what I’m doing wrong

Tell me what I’m doing wrong

What should I change for you? To put me at their level

Oh I don’t know I don’t care anymore

But why do you still make me feel this way?


The song included two verses, one bridge, and one chorus.


GROUP PROJECT WORK

Final DAW look of the song (1/2)
The Waveform workspace final (2/2)

The Waveform project was started with a starting track that was more of a chilled, laid-back vibe, which Ethan put together really well. He sent it to me and I got to work adding a Drum Sample MIDI along with a step clip, something I loved using in Waveform project 2. Ethan had a lot of samples on his computer that he was able to load into the project, which sounded really good together. This first 40 second “demo” was then extended by both of us on Waveform with MIDI and effects to create the 3 minute 30 second song that it is now.

The change in pattern of the step clip can be seen after the first few measures of just the three consecutive maraca sounds.

For the drum sampler, I tweaked the envelopes and the length of the kick and snare in order to make it not reach the higher frequencies and be delivered with more of an “oomph.” The step clip was really helpful in also doing similar tweaks to the maracas of the drum sampler used, and I was able to make a fun intro supplemented by percussion with three maraca shakes that progress to a full rhythmic beat throughout the sound. For the MIDIs, the chords were decided by Ethan and went together really well, and he later added a more high-pitched “alien-like” MIDI that I used the Phaser plug-in on to drive that effect more. Reverb was used on so many tracks. The reverb I used on the drums, especially messing around with room size and dampness to expand the hit of the drums, and using the 4-band equalizer to emphasize the snare drums of the percussion.

Intro vox with choral plug-in.

I also made an intro vox meant to be quiet and blend in with the background but provide an “intro” to the song. It was coupled with the chorus effect to add that “background” rather than “lead” feel to this particular vox.

The SuperCollider-generated wav used.

In the middle, using an SCD file heavily influenced by PSET 3 and the recording code of PSET 2 in SuperCollider, I generated the .wav file “HighAccompaniment.wav” using MIDICPS and a sine wave oscillator synth, and the tempoclock of 1 that uses the measure system to start at measure 1. Pbinds and Pfx were used to create an “echo” effect in the code as well. It repeated 4 times and played 4 different notes at a slightly off-putting beat to the song, so that the other synths mask its sound but it is able to carry throughout the transition of the verse 1 to the bridge. I liked how it sounded with the rest of the Waveform track, and this aspect of the song was able to show the interdisciplinarity of computer music and all that we learned in this class.

Recording code.
Echo FX synth to private bus, which using Pfx we applied to the wav being generated.
Pbind! Which is then used with Ptpar to generate the wav.

Furthermore, when doing the final mix, I included a lot of compressors, especially on the vocals which needed EQ and compressing in order to make the vocals stand out but not clip the sound. Ethan and I had actually recorded our parts separately, but using the drum beat as a metronome guide when recording. We did close-mouth recording. The 4-band equaliser was helpful in emphasizing the lower notes and cutting off the sometimes “loudness” of high notes when people sing. This was important, especially when the Reverb plug-in was applied to the vox. All of these effect plug-ins were really important to make sure the song was soft around the edges and also worked. The fade out and mastering was done by Ethan.

The MP3 is here:

HOMEWORK 4: Waveform PRO, with MIDI

PROJECT OVERVIEW:

This project I made was meant to give more of an eerie, off-putting, sad feeling (what’s a better way to encapsulate midterm season, am I right?). I was very hesitant to put in my vocals because I think my voice is annoying, but I decided to in order to give that kind of breathy vocal sound that I was able to exploit to my liking using Reverb. I really went along with this eerie idea once I found the Cloud 1 Subtractive synth sound, which was a part of the Ambience category when looking for different subtractive MIDI sounds, and it really worked to my liking to create the odd feeling.

MIDI:

For MIDI, I chose to make four tracks – one I called “scintillating,” which was the arpeggio subtractive synth that is constant throughout the sound except for when it drops out during my vocals. The next MIDI is the cloud ambience, which makes you feel like you are in outer space. The third and fourth MIDIs were combined, and influenced heavily by our drum sampler MIDI tutorial lecture in class which I rewatched ~many times~ to get this right. It was the drum sampler and STEP track (I really liked using a STEP to add “flavor” to the drums).

For each of the MIDI tracks, I experimented with the 4-band equalizer, as hinted at in the prompt for this homework. Using the EQ, I was able to scrape the higher frequencies and not allow for anymore clipping like in the last project I submitted (yay for progress!). This was especially important, in tandem with the compressor, for the drum sampler MIDI recordings, since the hi-hat’s decibel level would go way too high when looking at the bottom left corner of Waveform PRO that shows the sound levels. With the compressor and EQ, I was able to handle this problem. Below is a screenshot of the step and drum sampler pattern I created in the beginning of the track, where the step pattern does not continue at the end.

The drum sampler MIDI pattern, with the Step pattern below.

The other MIDI I used was the Cloud 1 subtractive synth, which I used a lot of reverb on through the aux bus, to make the “room bigger.” The other MIDI connected to the aux bus was the drums and step. I also used the nonlinear space plugin on the Cloud 1 subtractive synth, but wasn’t really sure if I heard a difference. A really good compressor plug-in was the AUMultipleBandCompressor. The MIDI was hard to navigate at first because for a whole first two days, I thought there was something wrong with my virtual MIDI input and Waveform itself, because I couldn’t input values and hear the sounds. When I went back to the lecture, I still was confused as to how to make those sounds. Finally, I realized I needed to choose the output to be the MIDI and then play on the piano that pops up virtually on the left of the track.

Cloud 1 Subtractive synth with automation of volume/reverb.

For the “scintillator” MIDI track, which was actually called “Comb Harp JH,” I was able to create an arrangement/pattern that repeated throughout going through notes. It was interesting because this MIDI would not really stop playing even when pausing the track. I also used the automation on all/most of the MIDIs, using the volume and pan automation. The volume automation was used for the Comb Harp JH in order to quiet it down in the middle then bring it back up. I also used the volume, pan, and reverb automation on the vocal track. The most important plug-in for the aesthetic of the piece, I’d say, was reverb tweaking the “room space” because that was the important heady/airy quality that was given to the Cloud 1 synth and the vocals, making them sound much more spanning/full. Below is the automation curve and pattern for the Comb Harp JH synth.


For the vocal track, I made an interesting panning automation so that it could sound like I’m singing in different ears, where it goes from left to right as the vocals progress.

You can also see in this image that there is a overlap in vocal tracks that I recorded. This is because at one point, I didn’t really like the final note vocal thing I did, so I wanted to delete it. But, because Waveform doesn’t let you delete in between the tempo lines, I had an awkward gap in between vocal words that I kept for about 5 days because I didn’t know what to do with that gap and thought I could just use Echo or Reverb to carry over it. But then, I realized I could create a cool sound by overlapping the vocals and it did just that! I was able to create like a sense of call and answer very quickly like a cry of help in the vocals, giving that kind of lonely feeling.

SAMPLES:

For the samples, I used a synth sample called “Afloat Pad” which I used the phaser plug-in (it’s kind of like 40SC but easier to use in my opinion) and AUDynamicsCompressor for. I think the 4-band equalizer is much better than the AUDynamicsCompressor to be honest. I didn’t really hear a difference with this plug-in. For the vocals samples, I recorded some onto my computer using the MacBook Pro mic (these were the quieter samples that I had to use the EQ to bring the volume up on) and the one on my phone (that I had to use EQ/Compressor to bring the loudness down on). It was interesting how I could apply the EQ/Compressor to different segments within the same track to produce a different result.

MAIN TAKEAWAYS:

Now I know how to modulate volume and ensure no clipping occurs! And, I don’t really like the Distortion plug-in. I tried it once on the Cloud 1 synth, and it sounded so horrible I immediately needed to take a break from the project. Doing this project also made me realize how things can blend together in music if you spend a long time on the same thing, and I really needed to take frequent breaks to prevent “ear blindness.” It was fun messing around in Waveform again, however, and I’m so glad I’m learning so much from this class!

Below is the Final MP3 result. Thank you so much!


Waveform 11: At First Glance

The room I used to create music: 

The room I used to create this music was my dorm room in Ezra Stiles College. The single is a little spacious, and my suite is rather quiet because my suitemates are usually out and about doing their own thing. However, whenever I record at night, I make sure that hopefully my audio doesn’t travel into the hallway space. 

Project Write-Up:

When starting my project last week, I took the first couple of days after downloading Waveform DAW on Monday to binge-watch the Youtube series that showed us what to do and how to begin in Waveform.

I would say my favorite effect that came most in handy was actually the first effect I discovered. This was the slow down or speed up fade curve that you can create instead of using automation. Of course, automation is helpful for buildups in the middle, but most of my tracks faded out or caused a slowing down drop at the end that I was able to achieve really well using that feature.

An example of the slowing down fade out edited into audio clips.

I also messed around a lot with the “Wet” and “Dry” mix of various plug-ins, ultimately using almost all of them: Reverb, Chorus, Delay, Pitch-Shift, HP/LP, Compressor, Phaser, and Volume/Pan. Below I will write down an annotated version of my Log, so that I can describe my process of approaching this track and how I used and tested different plug-ins to find out the best vibe to create with my track.

In the beginning of the week, starting Monday, I downloaded Waveform and went through the Media Library tutorial on how to set up the DAW. I went through all the videos in this YouTube video series that Waveform created: https://www.youtube.com/playlist?list=PLaNjetabjrNoWj0ZCETvPEzAnrRQF6OmE.I then throughout the week binge-watched various Waveform tutorial videos and looked at the tutorial on how to insert and use Imagina Drum Loops. I downloaded them from the Tracktion Download Manager. I downloaded the same kind used in the tutorials, by the drummer Alex Filippino. 

The Imagina drum loop sample I used in the track, with modifications.

Then, after learning how to use and access SSLIB, I looked through some of the samples there (I only ended up using one for a background ambience effect).

Recordings:

On Thursday, I was struck by the creative force that shaped and transformed my track. I knew that i wanted to create something synth and drum heavy, as I’ve never really experimented with that kind of music before, but inspiration to record and “capture the essence” of my location struck when I was at a Black Lives Matter protest in the New Haven Green on Thursday. We were heading towards the end of the protest, and I felt more fired up and energetic than I had in a long time – this caused me to think about how to place my iPhone so that it was about 4-5 inches from me and my friends’ mouths and could also capture the crowd chanting all around us through ambience miking. I recorded a little snippet of the sounds I heard, as I was then being directed by an organizer to walk somewhere. You can hear the words they say like “Can you all hear me” in the distortions that I applied to the tracks. This was one of the only recordings I was planning to include in my track, until I decided to showcase some of my beatboxing (I used to be a beatboxer in my a cappella group in high school) by later close miking my own beatboxing into my iPhone microphone from 2-3 inches away. The picture of distortion and slowing down/fading out from the beginning is what I applied to this audio. This sample formed the main part of the climax of the track I used plugins and automation to center around. I also watched a video that tried to teach about a new Waveform feature called the Drum sampler, but when I tried it it was very advanced and hard to control. The drum samples seemed better for the amount of time I had to complete the project, but I would love to experiment with the drum sampler next now that I have more experience with Waveform.

Samples, and how I used plug-ins and automation to edit them:

I searched through the sample loops provided in Waveform and came across a bass sample called “Epoch Sub Bass” which I immediately incorporated into the portion of the recording that I wanted to amp up. I used my newfound knowledge of the L button for loop to loop it once more, and I then messed around with the Reverb plug-in to add some damping because some frequencies were sounding a little bit crunchy while increasing the room size so you could truly feel that reverb and feel the people chanting around you. I tried a few other plugins like Phaser, which I felt as though didn’t really change anything, and I also tried directly changing the volume using a plug-in – I felt reverb gave more of the desired effect. Next, I used a compressor plug-in on the second Epoch Bass loop that allowed for the first round of bass to be extra loud and reverbery and for the next loop to tamp that back.

Epoch Sub Bass sample with reverb and compressor loops side-by-side.

After looking for hours through the SSLIB, I found an ambient outdoor storm sound I thought would nicely supplement the resolution of the protest sample, kind of like a storm brewing. I found a nice 100 BPM drum track that could go with the storm sample from the loops in Waveform called “Ghostly Beat.” I used automation on that so that the big cymbal crashes were enunciated in comparison to the drum kicks. Then I found a “Deep Dream Synth” from the Waveform DAW that really went well with my idea of trying to calm down the storm and end this track of turbulent revolution with something in the middle and more calm. The Delay plug-in created a cool full effect of echoing and just a fuller sound. I also added that to the “Silky Smooth Synth” I found that was found to fade out and close the song. I then worked on trying to enunciate the beginning drums from the Alex Filippino Imagina Drum loops, and found to use the Volume/Pan plugin to do a cool effect with the Pan. I made the main top layer drum beat increase in volume and pan to the right, while most other kick snares panned to the left. I liked the disconcerting effect this produced. It took some time formatting all six or so drum loop tracks and trying to add a plugin to each one.

The “Ghostly Beat” Drum Sample, with Reverb and Automation.

I found a sample on accident in the Waveform DAW after 15 minutes of searching called “Euphoria Pad.” This was perfect for my track. I was able to automate this and blend it with the Silky Smooth Synth to create the fade out, ethereal theme I wanted for the end. I used automation to create a sort of hemisphere curvature, where there is a buildup and then release and fade out (I also faded using the slow down mechanism). I then also went back to my main BLM recording and decided I wanted to somehow make the ending slowdown fade out deeper (there’s a lot of build ups and releases in this track) and so I tried the pitch-correct plugin after unsuccessfully trying the Phaser and the Reverb. The pitch-corrector made me need to split up the ending of the recording from the beginning and somehow merge the tracks so there wasn’t an awkward gap in the recording. I also added the Phaser to the Euphoria Pad, and the Chorus plug-in to the Storm recording, mostly to increase the “room space” so that it was like you were actually in a storm. The Euphoria Pad automation was my favorite because it was a perfect hemispherical curve.

This curve in the Euphoria sample was automated to create a rise and fall and subsequent fade away at the end of the track.

For the beatboxing recording, I imported it and found that I needed to use a low-pass filter to try to take away from weird high frequencies that come at the end of smacking my lips together during beatboxing. That really solved the problem. Next, I added a bit of automation to make it fade out the right way but also build up in sound during the climax/resolution.

The beatboxing recording with automation and low-pass filter plug-in.

Plugins that I didn’t really like or didn’t seem to do anything:

I worked on trying out the 4-equalizer plug-in – I didn’t quite understand what it was or how it worked, especially in deciding how it changed my audio, so I abandoned that plugin. I didn’t love the synths I found in SSLIB, at least for the very hard-hitting/activist vibe of this track – maybe the 4 second sounds or more chill vibes would suit another track. I really appreciated the sounds that were in the Waveform DAW. I also was a little bit confused about how the Phaser really affected my audio or the Chorus. They didn’t really add much.

I’d say my favorite plug-in was Reverb, and I really like tweaking the “Room size” parameter because it creates a more 8D, full effect. I think that was important for this track, which required you to try to place yourself in a situation/location, like the protest or the storm.

Here’s the final MP3. Thank you so much, I learned a lot!

iPhone XR Microphone Testing Research and Report

Part 1: Research

The iPhone XR has three microphones: one in the front at the top of the touch screen, one on the rear side of the phone near the back camera, and a bottom microphone near the edge of the bottom speaker. It primarily uses the bottom microphone when recording.

People can't hear me on iPhone XR - Apple Community
The iPhone XR features a microphone at the bottom and top on the front face, and below the rear camera as well.

The maximum sample rate is 48 kHz and bit depth is 32-bit. After researching different voice recording apps for the iPhone, I settled on Voice Record Pro. It has 9.9K reviews, and almost 5 stars, so I was hoping that that meant this is a good app to use. It allows the user to record voice memos and on-site sounds at unlimited length with configurable quality, and we can even export sounds to import from Google Drive. It can also record directly into the .WAV format, which was the requirement of this assignment. Not to mention, it’s free!

This is a view of the Voice Recorder Pro app interface.

Other apps I researched include Voice Memos (of course, since it was already downloaded into our iPhones from the beginning) but I was quick to rule this out because I am unable to record in a .wav format. Another high contender was “Awesome Voice Recorder” which was said to be best for music industry professionals, and also supports .WAV format. However, I think the Voice Record Pro would have been easier to use, and I was able to set its gain control to 0 which is a requirement of the assignment.

Part 2: Data and Recording

I chose to use my MacBook Pro laptop speakers to generate the sine sweep and white noise from Audacity. I chose my independent variable, or the variable that I change, to be the placement of the iPhone XR’s bottom microphone in relation to the laptop speaker. I placed the iPhone next to the laptop speakers, which are located on either side of the keyboard, two ways: with the iPhone bottom microphone next to the laptop speaker or with it flipped around on the other side.

Audacity Sine Sweep screen grab.

spectrum.txt — the sine sweep generated by Audacity’s .txt file.

Data for sine sweep in Audacity.

For the sine sweep, as I expected, the audio recording was more stable for the iPhone microphone being right next to the speaker in contrast to it facing the opposite direction. Right at around 3000 Hz for the iPhone mic next to the speaker, the dB drops and becomes a lot bumpier than the clean sine sweep of the original audio. However, with the iPhone mic facing away in the opposite direction, the audio grab is rocky from the start and features many bumps. It start being irregular from around 300 Hz itself.

Data acquired from Audacity for White Noise.

For the white noise, interestingly enough the original generation itself is supposed to be rocky in comparison to the sine sweep. Somehow, the dB in the iPhone mic seemed to be featuring a higher number than the original, but we can see the audio taper down at the end in the higher frequencies for both iPhone grabs. Again, the microphone away from the speaker is bumpier.

In terms of spectral flatness, I think that the iPhone mic, when optimized to be placed right next to a speaker or source of sound, is pretty good at having a flat response with lower frequencies up until 3000 Hz and really high frequencies. For white noise, it has more shaped response.

I will link the Google Document that has the original tables rather than screenshots here: https://docs.google.com/document/d/17ApBtmifboUHYZuteERxK-Ud8an20-QOCtMtIAt63r4/edit?usp=sharing.

The folder containing the four iPhone recorded .WAV files can be found here: https://drive.google.com/drive/folders/1CGA7ifcNeyNqp98-VYT8QKxWwDsMxCAk?usp=sharing.

What I would do differently:

I think I was really apprehensive at first to turn the laptop speaker all the way up since I was in my dorm room with suitemates who, if they could hear me playing the sine sweep, would probably be very angry with me. I tried to play it off like an ambulance, however. I would also try different variables of location, like what it would sound like in a practice room and what the audio recording’s data would look like, since my room has some ambient noise as my window faces the street. The window, however, was closed, and all my fans were off in the making of these recordings.

Citations:

https://discussions.apple.com/content/attachment/8db352cc-b4df-461b-9e14-94d0e5629571

https://apps.apple.com/us/app/voice-record-pro/id546983235

https://www.howtoisolve.com/where-is-the-microphone-on-iphone-xs-max-iphone-xs-iphone-xr-location/

Centro Latinoamericano de Altos Estudios Musicales (CLAEM) Electronic Music Laboratory

In any analysis of the history of computer music in the global technological revolution of the late 20th century, it is imperative to include the Centro Latinoamericano de Altos Estudios Musicales (CLAEM), a music laboratory established in the Instituto Torcuato Di Tella in Buenos Aires, Argentina. This space for musical collaboration across countries and disciplines, founded in 1963, was an early pioneer of the Latin American electroacoustic sound landscape. Throughout its short-lived eight years from 1964 to 1971, the laboratory left a large mark on musical history and produced some of the most influential and beautiful electronic tapes. 

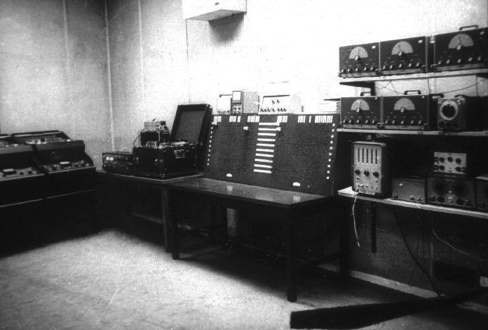
The CLAEM Electronic Music Laboratory, 1964.

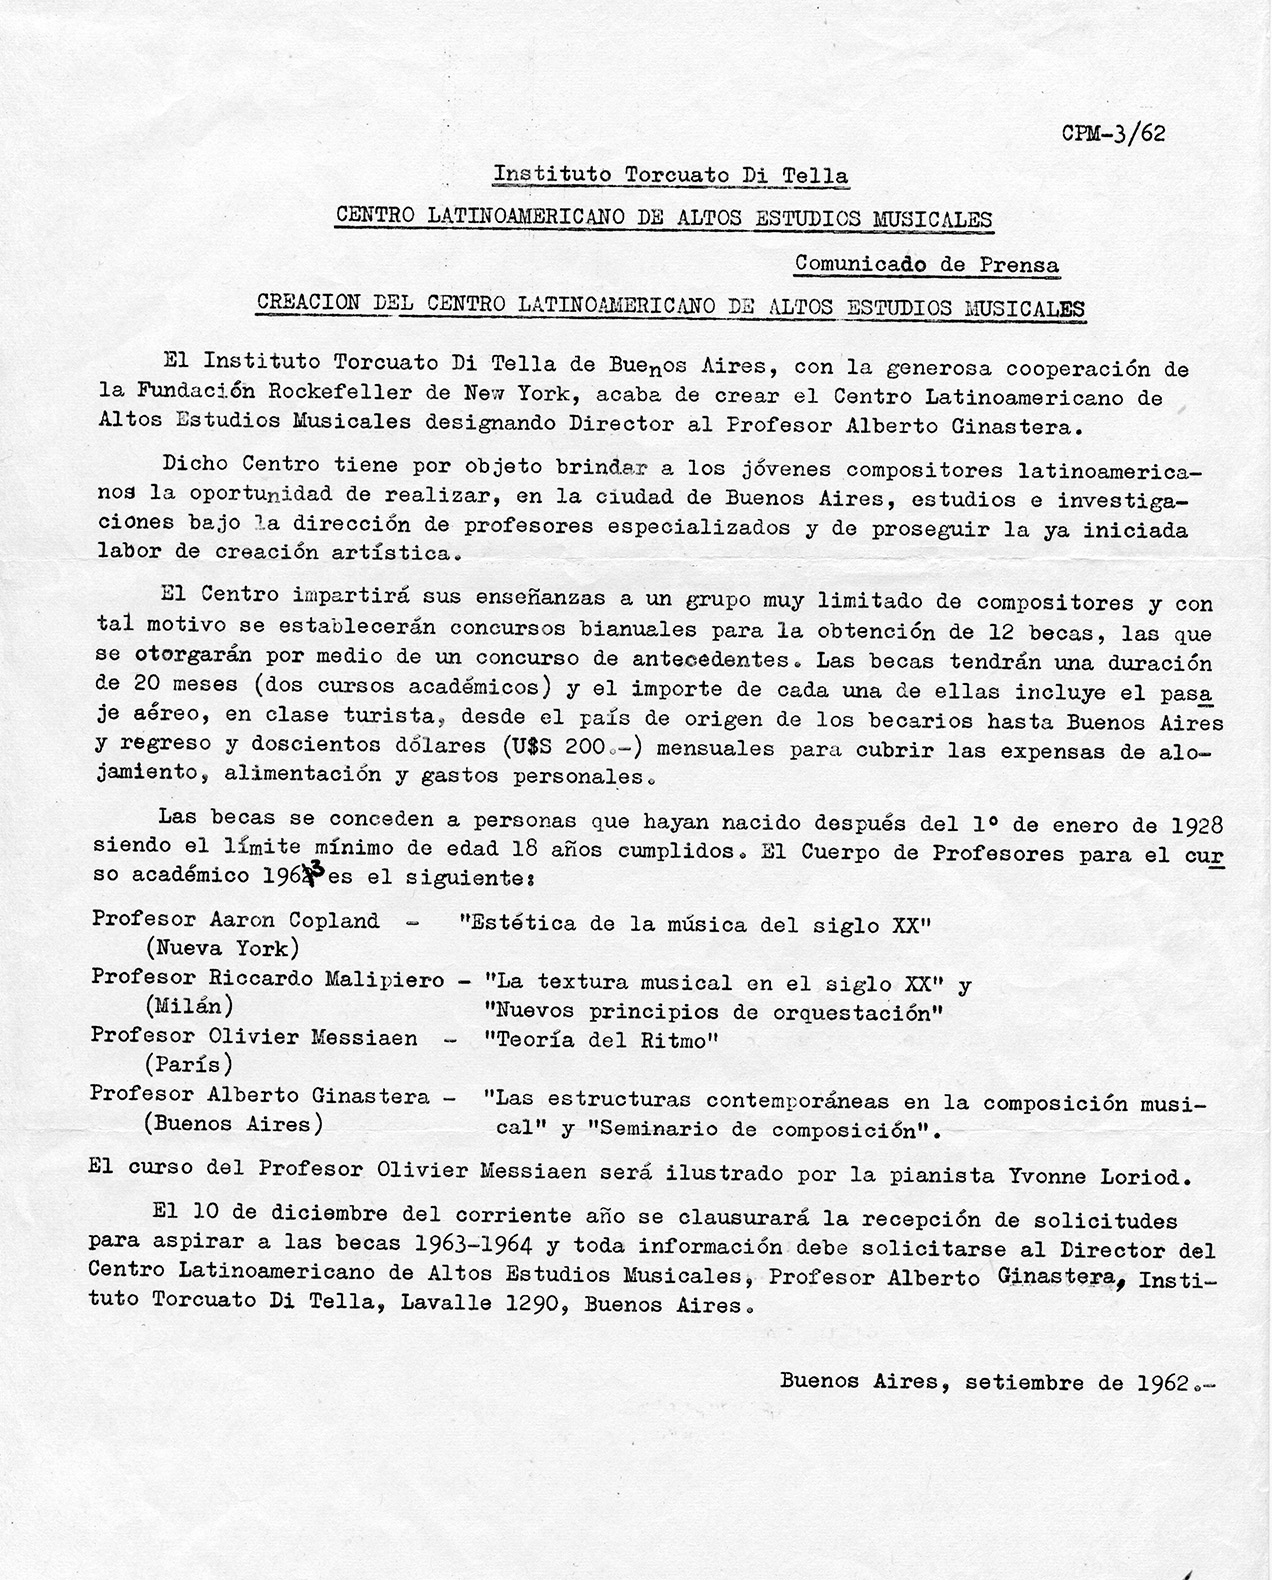
Funded by the Rockefeller Foundation and directed by Argentine composer Alberto Ginastera, the CLAEM served as the pinnacle of the transnational world of contemporary music-making, as its main focus was collaboration between composers and students from Latin America and Europe. Musicians came to the CLAEM from far and wide to learn and exchange ideas with some of the most influential and passionate composers of the time. Its impressive roster included Oliver Messiaen, Aaron Copland, Iannis Xenakis, Luigi Dallapiccola, Mario Davidovsky, Luis de Pablo, Bruno Maderna, and Eric Salzman, among others. The first tape piece produced at this laboratory in 1964 was Intensidad y Altura, which translates to “Intensity and Altitude,” created by Peruvian composer César Bolaños. Music composed at this institution reflected the diversity of musicians and composers that collaborated with each other – a wide spectrum of approaches, including serialism, sound-mass compositions, aleatoric and indeterminate operations, mobile forms, live improvisation, graphic notations, and electronic and musique concréte techniques were all employed to generate computer music. These works were all produced at the well-equipped electroacoustic studio called Laboratorio de música electrónica (Electronic Music Laboratory), and this studio became the training center for more than 50 composers representing their Latin American countries of origin: Argentina, Bolivia, Brazil, Colombia, Costa Rica, Chile, Ecuador, Guatemala, Mexico, Peru, Puerto Rico, and Uruguay. The studio was modeled after the Columbia-Princeton Electronic Music Center, a recording studio that many composers had also gone on to train and produce music in. CLAEM soon became known for its legacy as a training ground for a significant generation of Latin American composers, who each played important roles in the global music industry.

CLAEM press release, September 1962.

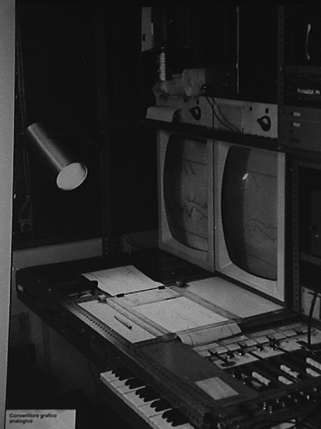
In the 60s, Fernando von Reichenbach became the center’s technical director, and his musical inventions first utilized by CLEAM are now starting to gain international recognition for their impact on the history of computer music. He invented the Convertidor Gráfico Analógico, or Analog Graphic Convertor, which converted graphic scores from a paper roll into electronic control signals adapted to work with analog instruments. The first piece created using this device, also known as the “Catalina,” was Analogías Paraboloides by Pedro Caryeveschi in 1970. Other device inventions of his include the keyboard-controlled octave filter and a special patch-bay that helped solve complex problems at the lab. He was most revered, however, for his redesign of the laboratory in 1966, where he was praised for knowing how to maximize the efficiency of the space for composers and was hailed as “ingeniero” by his co-workers.

Redesigned CLAEM laboratory by von Reichenbach in 1966.
Analog Graphic Convertor.


Another important historical event that influenced the music created by the CLAEM were the political conditions of Argentina in the 1960s. The de facto presidency of Juan Carlos Onganía in 1966 emphasized government censorship of theater and the visual arts. Composers therefore worked under fear of suppression, and officials frequently closed the building that the CLAEM was housed in due to controversial arts presentations. The Laboratorio saw its peak activity in the second half of the 1960s, and the military paid little attention to the music written at CLAEM, CLAEM musicians were still victims of repression at times. Ginastera’s Bomarzo and Gabriel BrnÄic’s ¡Volveremos a las montañas! followed by his arrest and torture were hallmarks of political instability – leading the center to close in 1971 in part due to political pressure. 

The most successful electroacoustic composition at CLAEM was actually its first production: Intensidad y Altura by Peruvian composer César Bolaños, who studied electronics at the R.C.A. Institute from 1960 to 1963. He led a two-year fellowship, where he taught at the laboratory in 1965-66. He stayed at the center longer than any other student, writing electronic music for the choreographies of Jorgelina Martínez D’Or and other audio-visual entertainment. Bolaños wrote Intensidad y Altura based on the poem of the same name by Peruvian writer César Vallejo. The composer made use of the limited functioning equipment at the laboratory, musique concréte techniques with electronically generated and processed sounds. The piece continues to be played at festivals today.

The CLAEM provided a special institutional experience that deserves to be documented in world-wide computer music history, as it sowed the seeds of a strong tradition of composers across the south of Latin America, and although it was open for a relatively short period of time, the legendary studio is a memorable beacon for the Latin American avant-garde.

SOURCES:

“About the History of Music and Technology in Latin America | RICARDO DAL FARRA | Art + New Media in Latin America.” Accessed September 9, 2020. https://mediaartlatinamerica.interartive.org/2016/12/history-music-technology-latinoamerica.

HERRERA, E. (2018). Electroacoustic music at CLAEM: A pioneer studio in latin america. Journal of the Society for American Music, 12(2), 179-212. doi:http://dx.doi.org/10.1017/S1752196318000056

“Ricardo Dal Farra : Latin American Electroacoustic Music Collection.” Accessed September 10, 2020. https://www.fondation-langlois.org/html/e/page.php?NumPage=546.
“Centro Latinamericano de Altos Estudios Musicales (CLAEM) press release,” Cook Music Library Digital Exhibitions, accessed September 10, 2020, http://collections.libraries.indiana.edu/cookmusiclibrary/items/show/47.