Platformer Sounds in SuperCollider

Platformers are a genre of games that involve heavy use of climbing and jumping in order to progress. Examples include Super Mario Bros, Hollow Knight, VVVVVV.

~Inspiration~

Over Thanksgiving break, I played a lot of games… maybe a little too much! This project is heavily inspired by a few games. For example, I picked up Hollow Knight which is a fun yet frustrating single-player platformer game. The sounds of jumping, using items, ambient sounds, and swinging a nail followed me to my sleep. I thought that I could try replicating some of them for my final project.

Ambient Sounds

Snowy Environment

The first piece of the sound pack I started working on were the ambient sounds. These would be used to indicate the environment the current level of the game. I began by creating a snowy feel using the LFNoise1 Ugen in a SynthDef.


At first, I had trouble configuring the audio signal to work with the envelope. At first, I only had the attack and release time defined for the percussive envelope. This caused the audio rate to be released linearly, which I did not want. Instead, I wanted the sound to be at the same sound level until the end where it should level off. To remedy this problem, I used the curve argument of Env and set it to 100 instead of the default -4.

Here’s the resulting sound clip:

Rainy Environment

Moving on to the next ambient sound I created, I decided to introduce a rainy environment. I used a similar approach to creating the instrument used for the snowy environment. Instead of using a low pass filter, I opted to use a high pass filter instead. I also changed the frequency to more accurately capture the sound of hard rainfall.


After that, I applied the reverb effect to it using the Pfx class.

Background Music

For the background music, I wanted to experiment with some orchestral sounds. It was pretty difficult trying to get a convincing SynthDef for strings, so I looked at sccode for ideas. I found that someone made some code that mapped samples to midi notes in the link here so I used that as the basis for the granular SynthDef which uses samples provided by peastman. It uses the buffer to load the instruments. Here’s the code that maps the instrument samples to MIDI notes. It’s a long block of code so you’ll have to look at the image in another tab to view it.

Now that the instrument has been defined, I decided that I want the music to have some chromatic notes to produce an unnerving sound. Something that would be played during a final boss fight. I configured it to use the default TempoClock at 60 bpm and I kept it simple with a 4/4 time signature. It is mainly in E major, but as I mentioned, there’s some chromatic notes like natural Cs and Ds. Here’s the resulting clip.

Walking

Moving on to the sounds that would be triggered by events, I started by creating the walking sound. I looked back at the sound_fx.scd file to follow this piece of advice given:

Wise words

I recorded some sounds from a game and put them into ocenaudio and Audacity to use their FFT features and here were the results from ocenaudio, highlighting only the portion of a single footstep sound.

ocenaudio footstep FFT.

I noticed that frequencies around 1000hz and below were the most prominent, so the frequency of the footstep should probably be emphasized around there. The audio recording includes pretty loud ambient sounds, so that probably explains the higher frequencies.

I attempted to replicate this sound using a SinOsc Ugen and a Line to generate the signal. I used the Line for the frequency argument of the SinOsc because it allows me to have more flexibility knowing that a footstep does not have a constant frequency. I configured the envelope to start at 300 and end at 1, resulting in this footstep sound which I ran through an infinite Ptpar.

SynthDef(\walking, {
	var sig;
	var line = Line.kr(200, 1, 0.02, doneAction: 2);
	sig = SinOsc.ar(line);

	Out.ar([0,1], sig * 0.6);
}).add;

~soundFootstep = Pbind(
	\instrument, \walking,
	\dur, Pseq([0.3],1)
);

(
Ptpar([
	0, Ppar([~soundFootstep], 1)
], inf).play;
)

Jumping

For the jump sound effect, I wanted to have a bubbly type of sound. I used a similar approach to the footstep SynthDef, but I made the Line rise in frequency instead of descend. Also, I made the envelope and Line sustain significantly longer.

ocenaudio jump FFT

I took note of the FFT of the jump sound from the game, but it didn’t result in the type of sound I wanted. It was really harsh so I modified the frequencies a bit resulting in this sound clip

SynthDef(\jumping, {|time = 0.25|
var sig;
var env = EnvGen.kr(Env.perc(0.01, time), doneAction: 2);
var line = Line.kr(100, 200, time, doneAction: 2);
sig = SinOsc.ar(line);

Out.ar([0,1], sig * 0.8 * env);
}).add;


~soundJump = Pbind(
\instrument, \jumping,
\dur, Pseq([2],1)
);


(
Ptpar([
0, Ppar([~soundJump], 1)
], inf).play;

)

Landing

I had a GENIUS idea of continuing to use the Line class to create my signals. You’ll never guess how I achieved the landing sound effect. Well, you might. I just swapped the start and end frequencies of the line. It ended up making an okay good landing sound, which sounds like this

I tweaked a little more and changed the end frequency to be lower at 10, which I think sounds a bit better.

SynthDef(\landing, {|time=0.1|
var sig;
var env = EnvGen.kr(Env.perc(0.01, time), doneAction: 2);
var line = Line.kr(200, 10, time, doneAction: 2);
sig = SinOsc.ar(line);

Out.ar([0,1], sig * env);
}).add;


~soundLand = Pbind(
\instrument, \landing,
\dur, Pseq([2],1)
);


(
Ptpar([
0, Ppar([~soundLand], 1)
], inf).play;

)

Picking up an item

When I brainstormed what kind of sound to give the item pickup, I thought of Stardew Valley and its sounds, specifically the harvesting. I used this as an excuse to take a break from homework to play the game for research purposes. The sound of picking up items sounded pretty simple. Here’s what I came up with using this code

SynthDef(\pickup, {|freq|
var osc, sig, line;
line = Line.kr(100, 400, 0.05, doneAction: 2);
osc = SinOsc.ar(line);
sig = osc * EnvGen.ar(Env.perc(0.03, 0.75, curve: \cubed), doneAction: 2);
Out.ar([0,1], sig * osc * 0.8);

}
).add;

~soundPickup = Pbind(
\instrument, \pickup,
\dur, Pseq([1],1)
);

(
Ptpar([
0, Ppar([~soundPickup], 1)
], inf).play;

)

Throwing away an item

For the final sound that I created for this project, I made something to pair with picking up an item. I wanted it to have a somber tone that elicits an image of a frown. The disappointment of the item being thrown emanating from itself. As sad as the fact that this class is ending. Anyways, here’s the sound!

SynthDef(\throw, {|freq|
var osc, sig, line;
line = Line.kr(400, 50, 0.2, doneAction: 2);
osc = SinOsc.ar(line);
sig = osc * EnvGen.ar(Env.perc(0.03, 0.75, curve: \cubed), doneAction: 2);
Out.ar([0,1], sig * osc * 0.8);

}
).add;

~soundThrow = Pbind(
\instrument, \throw,
\dur, Pseq([1],1)
);

(
Ptpar([
0, Ppar([~soundThrow], 1)
], inf).play;

)

Reflection

Doing this project has made me more appreciative of the sound engineering of every game I play. I now find myself analyzing the different sounds that the developers choose to incorporate and sit in thought how they made that. There’s surely some, but not many, that use programming languages like SuperCollider to synthesize such sounds. Exploring new concepts like buffers has been pretty challenging, but it has shown me that there’s a wide range of choices available with SuperCollider.

Thanks for reading my writeup. Hope you enjoyed!

Final Project: Waveform Supremacy and a Splash of SuperCollider

OVERVIEW

The Final Project for CPSC 035 that I completed alongside Ethan Kopf, my partner, is a 3 and a half minute song using MIDI, samples, and even a SuperCollider-generated .wav sample that culminate in a song with lyrics I wrote. It was actually much easier to collaborate on a Waveform project than I thought, being able to email or text the ZIP file whenever necessary. We also tried following the requirements of Waveform Project 2 when creating this song, in order to ensure that we made full use of all we learned about frequency filters and effects plug-ins, along with concepts like gain, mixing, and mastering.

BEGINNING THE PROJECT

We started out by consulting on what type of song we wanted to create, and I had an idea of some kind of base for lyrics we could use in the song. A few days later, I typed them up on a Google Doc. Here they are:

Lyrics

VERSE 1:

When you were falling down, I was there for you, I was there for you

When you were at your lowest point, who was there to guide you back home?

And now, when I’m in the same place, falling down in this deep abyss

Are you gonna be there for me? Are you gonna be there for me?

BRIDGE:

Tired of this trick,

I’m just a doormat to you, I see it now

Tired of being a fool,

When you don’t care about me like that

Why-why-why

Couldn’t you just say that you don’t care about me like that

I’m tired of being a fool, thinking I could get you to love me back

CHORUS:

Instead of leading me on

You don’t return my frequency

All that I gave, there’s nothing to receive

Why do I keep going back when there’s nothing here for me?

I should just move on

From this one-sided love (one-sided love!)

One-sided love (one-sided love)

I’m moving on from this one-sided love

VERSE 2:

I see how you look at the others

I know you would never see me

In that same way

Just tell me what I’m doing wrong

Tell me what I’m doing wrong

What should I change for you? To put me at their level

Oh I don’t know I don’t care anymore

But why do you still make me feel this way?


The song included two verses, one bridge, and one chorus.


GROUP PROJECT WORK

Final DAW look of the song (1/2)
The Waveform workspace final (2/2)

The Waveform project was started with a starting track that was more of a chilled, laid-back vibe, which Ethan put together really well. He sent it to me and I got to work adding a Drum Sample MIDI along with a step clip, something I loved using in Waveform project 2. Ethan had a lot of samples on his computer that he was able to load into the project, which sounded really good together. This first 40 second “demo” was then extended by both of us on Waveform with MIDI and effects to create the 3 minute 30 second song that it is now.

The change in pattern of the step clip can be seen after the first few measures of just the three consecutive maraca sounds.

For the drum sampler, I tweaked the envelopes and the length of the kick and snare in order to make it not reach the higher frequencies and be delivered with more of an “oomph.” The step clip was really helpful in also doing similar tweaks to the maracas of the drum sampler used, and I was able to make a fun intro supplemented by percussion with three maraca shakes that progress to a full rhythmic beat throughout the sound. For the MIDIs, the chords were decided by Ethan and went together really well, and he later added a more high-pitched “alien-like” MIDI that I used the Phaser plug-in on to drive that effect more. Reverb was used on so many tracks. The reverb I used on the drums, especially messing around with room size and dampness to expand the hit of the drums, and using the 4-band equalizer to emphasize the snare drums of the percussion.

Intro vox with choral plug-in.

I also made an intro vox meant to be quiet and blend in with the background but provide an “intro” to the song. It was coupled with the chorus effect to add that “background” rather than “lead” feel to this particular vox.

The SuperCollider-generated wav used.

In the middle, using an SCD file heavily influenced by PSET 3 and the recording code of PSET 2 in SuperCollider, I generated the .wav file “HighAccompaniment.wav” using MIDICPS and a sine wave oscillator synth, and the tempoclock of 1 that uses the measure system to start at measure 1. Pbinds and Pfx were used to create an “echo” effect in the code as well. It repeated 4 times and played 4 different notes at a slightly off-putting beat to the song, so that the other synths mask its sound but it is able to carry throughout the transition of the verse 1 to the bridge. I liked how it sounded with the rest of the Waveform track, and this aspect of the song was able to show the interdisciplinarity of computer music and all that we learned in this class.

Recording code.
Echo FX synth to private bus, which using Pfx we applied to the wav being generated.
Pbind! Which is then used with Ptpar to generate the wav.

Furthermore, when doing the final mix, I included a lot of compressors, especially on the vocals which needed EQ and compressing in order to make the vocals stand out but not clip the sound. Ethan and I had actually recorded our parts separately, but using the drum beat as a metronome guide when recording. We did close-mouth recording. The 4-band equaliser was helpful in emphasizing the lower notes and cutting off the sometimes “loudness” of high notes when people sing. This was important, especially when the Reverb plug-in was applied to the vox. All of these effect plug-ins were really important to make sure the song was soft around the edges and also worked. The fade out and mastering was done by Ethan.

The MP3 is here:

Waveform Final Project: Masks

With this final composition, my main composition goal was to create a bittersweet piece that I myself would return to if I ever feel a little down in the future. From a technical perspective, I aimed to utilize all the skills I had acquired from the Supercollider module into my song.

Currently, my default “simp song” is Pressure by Draper.

This song’s balance between sadness and motivation works wonders with encouraging me to carry on in tough times. Musically, I’d pinpoint the reason behind its effectiveness to the fullness of it’s sound. Before taking CPSC035, I never noticed all the harmonies and pads in the background that fill in this song’s blank space; I always just heard the lead, bass, and percussion. Though I am still unable to pinpoint the exact number of tracks and their respective notes throughout the song (although I suppose that’s also sign of a good pad), I certainly planned to have ample padding in my musical composition. Another aspect of this song that I wanted to carry over to my song was the tranquil break between powerful drives.

With respect to the more technical side of this song, there are a few things I learned throughout the SuperCollider module (some are SuperCollider related, others are just me pondering about Waveform in the shower):

  1. You don’t have to find the perfect sample for what you’re looking for. I specifically struggled with this in my first two Waveform Projects, spending hours trying to find just the right Kick, Snare, and Hihats, before being left dissatisfied an just using the 808 and 909 drum kit samples instead. Yet in SuperCollider, the fact that I was able to program base and snare sounds from just simple waves a few effects proved to me that the sample only has to be close to what is desired, after which using an abundance of effects is completely acceptable
  2. Use automation curves for apply effects to certain notes. In my last waveform project, I really struggled with the applications of automation curves because I was never able to quite figure out how to automate effects parameters. Turns out, I have to first drag it into the effects chain before being able to select the specific parameter of automation (I thought you had to make the automation curve first, then map it to a parameter). Now with the ability to automate effects parameters, I was able to selectively apply effects to certain notes. For example, if I wanted to add reverb to only the last notes of a musical phrase, I could use an automation curve to turn the reverb’s wet level down to 0 for all notes except the last note.
  3. Use automation curves to give sounds more character. One really cool thing we learned in SuperCollider is how we could use oscillators to modulate certain parameters on an effect. Because of this, I also aimed to use automation curves to mimic the oscillator effect on some of my parameter plugins
  4. Envelopes: To be completely honest, I didn’t really have a full understanding of how envelopes functioned, and what the difference between adsr and perc envelopes were. Yet through Supercollider, the whole concept of treating an envelope like a time-based function that modifies its input signal really helped me understand. The most helpful was the assignment where we had to create our own subtractive synth: while having to juggle the whole envelope difference between adsr and perc was really frustrating, it undoubtedly helped me understand envelopes in general

The first thing I knew I needed to do in this song was to separate my different percussive instruments onto different tracks. On last waveform song, I decided to use just the multisampler as an easy way to get by with a genre of music that usually had a repetitive bass, so I did not expect myself to do any percussive automation. However, I eventually ran into the problem, albeit too late, that using the multisampler meant that any plugin or effect I wanted to add to one instrument would have to be added to the rest of the percussive instruments. Thus, this time I created separate tracks for the kick, snare, hihat, and claves, allowing me to also set their own filters and automation tracks so that the percussion would have more life.

The 2nd step in my song was to find minor chord progression that would set the tone of the song. The chord progression I ended up going with was c minor -> g minor -> Ab major -> Bb major, which follows the i-v-VI-VII progression. Right away, I wanted to test the capabilities of using automation curves on more than just pan and volume, so I decided to have incorporate a bass drop immediately in measure 10. Yet more than just a gradual buildup in sound, I also wanted have a gradual buildup shift in the EQ. In order to apply this to both my Viola and Low Pad, I used a bus that both the channels fed into, and applied a 4-band EQ with automation in the bus.

When thinking back to what made the bass drops in Draper’s Pressure so effective, I noticed that the main contrast was the amount and level of padding . Yet, since I already used a padding in my buildup, I thought, “Meh, I’ll add another Pad.” Because the point of this padding was to be almost like the lead post-drop, I had placed in the sweet-spot of frequencies that our ears are most sensitive, which is to say around 400-800 Hz. However, having both the Lead and the pad be the same instrument was quite a problem, because the pad had to be adsr but having such a powerful sustaining lead was actually kind of painful to listen to. Thus, in order to emphasize the attack of the lead even more than just adjusting the adsr levels, I added another track built from 4OSC, which had sine and triangle waves within a percussive envelope, repeating the same notes as the pad to give a more distinctive character to the lead.

Despite the many parts of my liquid drums composition that I disliked, one aspect I wanted to keep was the high-pitched secondary melody complementing the lead. Since the doubling of my pad with my lead led to a more boring lead, having these bells as a secondary melody complemented very well throughout the chorus. In this case, however, I enjoyed the sound having the secondary melody being centered.

With both the 4OSC and the high pitch adding character to the low pad, I decided to use another approach to add character to the lo pad: automation (that I described in point 4 in the envelope). I chose to automate the 4-Band equalizer in similar fashion to what I did with the bus during the build-up, but this one was solely on the lo pad (without the viola). I first tried a linear oscillation, but I soon realized that such an oscillation was not good because frequencies are not a linear in nature (the whole 1/wavelength thing), so curvature was necessary for the intended effect. I also incorporated a pan automation that creates something that resembled a little bit like the Doppler Effect.

As mentioned early, I also really wanted this song to incorporate a rest in the middle of the chorus. Though the rest I had incorporated in my last song was alright, I was adamant about being more meticulous about the fade and the build-up beyond just one decrescendo and one crescendo. My central misconception was that quiet did not necessarily mean boring; there was still room for fun plugin automation and effects in the rest. The idea I eventually came up with was to increase the volume of my  Lo pad up to the beginning of each measure, only to have it fade out immediately while also using the hihat to slowly fade out, similar to a delay.

The most challenging part for me was definitely the 2nd bass drop; I wanted to make this bass drop even more grand than the first, so one heartbreaking compromise I decided to make was to decrease the overall volume of first bass drop just a bit to give more room for the second bass drop amplitudes. From the juxtaposition between the first bass drop/ chorus and the rest, I noticed that there was certainty a complementary juxtaposition between silence and sound; since juxtapositions run both ways, I decided that I’d add a beat of silence just before the drop to creative an even more dramatic emphasis on my second drop. In addition to this, I also added drums immediately at the drop, using a percussive drum beat that resembled that of dubstep and hip-hop (since dubstep always has the strongest drops). This section is also where I decided to add panning to create even more fullness to the room. For my high secondary melody, I had each note pan between completely left and completely right. Finally to add even more volume to my sound, this was the only section that I incorporated a dedicated low bass track.

Below is a screenshot of my entire Waveform, and the mp3. I decided to name this song Mask: just as many people go to a mask-like facade during difficult times, I will go to this song.

Final Reflection thoughts:

Overall, I am really proud of this piece; to me, what’s most important was that I could say I really did show my best work here; the largest problem I had previously with filling in silence behind a melody was solved because of the pads I used throughout the song, and at no point did I, as a listener, feel like I was bored. I have yet to have another down-in-the-dumps type of mood since creating this song, but I know that I’ll at least give it a listen when the time comes: just hopefully not too close to finals. As far as further questions and improvements, one that already comes to mind is this issue I commonly have with inconsistent sound levels of Sine wave sounds: when experimenting with pure sine waves I could never get the track to play at a consistent level, and adding more tracks to it when only made the sine wave more and more distorted and quiet. Yet another issue I had was how sometimes there’d be popping and cracking despite the fact that I’m not redlining and that my sound envelopes were not attacking too fast. For improvements, I’d next try to be able to add more audio samples to my tracks that I record, whether that be just a piano or percussive sound effects. When peering at some of the pre-loaded projects on waveform, I noticed that almost none use Waveform MIDI to create sounds, but instead use Waveform for its plugins and for mixing.


Randomly Generated Lofi in SuperCollider

Intro/Ideas:

My original goal for this project was to create a (semi-)randomly generated classical piece in SuperCollider. However, as I began coding/trying to figure out how to use randomness, I decided to create a lofi-type piece instead because it’s more specific, (in my opinion) compositionally simpler, and there’s more opportunity for different SynthDefs.

Rewinding Memories on Spotify
“Rewinding Memories”, the piece I was most influenced by

I listened to a few random lofi songs from the Spotify playlist “lofi hip hop music” to get a better grasp of the chords, the structure, etc. Songs I listened to (with notes I wrote down):

  • “Rewinding Memories” by Refeeld and Project AER: low/pulsing drum, higher clap-type around 0:36, bass, guitar around 0:36, shimmering sound around 0:57
  • “Until The Morning Comes” by softy, no one’s perfect: nice acoustic guitar
  • “Put” by kudo
  • “Under Your Skin” by BluntOne and Baen Mow: interesting sound around 1:50
  • “Morning Dreams” by Mondo Loops

After listening to the songs and playing around on the piano, I decided to only use 7th and 9th chords and to never have the base of a chord be the leading tone (7th note in the scale). I was also hesitant about the V chord because it’s so dominant (and the lofi I listened to was very calm/didn’t really have the typical tonic-subdominant-dominant chord progression), but I ultimately decided to include it with the caveat that it could not occur more than once within the progression. I also came up with a few other rules…

At this point I realized something — it’s hard to balance randomness and having a piece that sounds good! A fully random piece would sound terrible, but I also didn’t want it to sound too contrived (i.e. have the rules be so rigid that the piece barely changed with each iteration/generation).  The chord rules (above) were definitely one of the more contrived sections.

Code!

Next, I started actually coding. I randomly generated a key — using rrand(1, 12) — and a tempo — using rrand(80, 135)/100.

Making Pbinds (generating notes & rhythms)

I decided to start by coding the notes/rhythms for all the different parts (e.g. bass, chords, melody, harmony, percussion). For the chord progression, I just used the .rand, if statements, while loops, and lists. This part wasn’t too bad — I had a few lines to randomly generate which chords would go in the ~chords variable, and then a few more lines for edge cases (ex. if one chord was repeated three times). For the bass (variable called ~bass), I created a ~n_bass (bass notes) variable and a ~r_bass (bass rhythm) variable to later use to create a Pbind. I randomly generated a slow rhythm for the bass (i.e. only quarter notes and slower) using a few lines heavily involving .rand, and then added the chord notes. to ~n_bass. I coded the piano chords (~pc) similarly, with a ~n_pc for notes and a ~r_pc for rhythm. One interesting thing I found out was that 3.rand randomly gives you 0, 1, or 2, but 3.0.rand gives you a random real number from 0 to 3 — this was messing me up because I was multiplying a variable by decimals at one point, but wanted to do (that variable).rand. To fix this, I used .round.

Afterwards, I created the melody (~mel1) Pbind (with the associated variables ~r_mel1 and ~r_mel1) — for this, my rules were that it would have 2-5 notes per measure and be all 8th notes or slower. I also wanted to create a melody’ (~mel1b) that was basically the same as the original melody but more active — i.e. with some added notes (2-4/measure) and a more active rhythm. I also ran into a problem here because I wanted to use .insert but it only works for Lists, so I had to go back to all my initializations and change the Arrays (the automatic class when you do something like ~variable = [1, 4, 0]; ) to Lists.

The following is an example recording of what I had at this point — bass, chords, and melody (so far, with a very basic Synth that I pulled from a previous project; no effects and no percussion).


Text in post window
Post window

The above picture is an example of what I had in my post window (not corresponding with the above recording): the key (+ 12 would be 12 semitones up from C, so still C); the chords (the progression is 3-3-0-5 (so IV-IV-I-vi), and the fifth note represents the inversion (here, since it’s 0, the chords are all in root position); the melody notes, and the harmony notes.

Making Synths

For the bass, I used PMOsc.ar and applied a low-pass filter. I wanted to have three other distinct melodic sounds: one for the chords, one for the melody, and one for the harmony. For the chords, I wanted the sound to be relatively muted/not too twangy (like the beginning of “Morning Dreams” or around 0:40 in “Under Your Skin”), so I mixed Formant.ar and SinOsc.ar, and then applied a low-pass filter at 400 and a high-pass filter at 200. For the melody, I used the same SynthDef as for the chords, but I changed the envelope, filter, and reverb settings. Lastly, I’d really liked the acoustic guitar in “Rewinding Memories”, so I used a mixture of SinOsc.ar and Pluck.ar to create a guitar-like SynthDef.

For the percussion, I also wanted to emulate the sounds in the songs I had listened to. I created a kick based off of the one in “Rewinding Memories” (see picture below).

Code for "kick" SynthDef
Code for “kick” SynthDef

I struggled for a long time on the higher, snare-type sound. I really wanted it to sound like the higher percussion in “Rewinding Memories” around 0:45 (which I realize probably isn’t a snare, but I called it a snare for lack of a better word), but mine ended up sounding pretty different. Overall, I was the happiest with my kick and my guitar sounds.

Other Synths

I created a “compression” SynthDef using Compander.ar, and a “dynamic” SynthDef that (per its name) takes a Pbind and changes its dynamic level.

Percussion Pbinds

After creating the percussion synths, I coded the rhythms similarly to how I did the bass — I didn’t want the drums to be too active (because the lofi beats were all pretty mellow), so I restricted the rhythms to 8th notes or slower. However, I did include the possibility for one 16th or 32nd in the kick (see picture).

In the picture to the left, there is a 3/5 probability that there is a 16th note or 32nd note — i.e. that we randomly choose one of the notes in ~r_kick and split it into a 16th or 32nd note and another duration (that when added to the 16th or 32nd note yields the duration of the original note we split).

The following is an example of what I had at this point: chords, kick, snare, bass, and melody.

Ordering/Structure:

I didn’t really know how to use randomness in the structure while still maintaining a semblance of a regular song progression, so this part also had a more rigid structure: I just completely wrote out two different possibilities (one starting with the chords, and one starting with the melody/bass), and then used .rand to randomly determine which one to use each time. The songs I listened to tended to start quietly, with just one or a few sounds, and then build, and then would suddenly drop out, build again, and then slowly fade out.

Option 1: starting with chords

Option 2: starting with melody/bass

Editing/Progression of Recordings

Note: if you’re going to listen to one, listen to recording 13 (my favorite of the ones below)! I also like the second halves of both 11 and 14.

Recording 7:


Recording 8: added a pan to the guitar/harmony (which comes in around 0:50)
note — needs more reverb/notes need to last longer


Recording 10: added quieter dynamics to the beginning/end, added compression around this point (might have been after this recording, not sure)


Recording 11 part 1: edited bass length
note — chords sound too gritty/full, especially during middle section — they’re detracting from the other instruments

Recording 11 part 2: I liked the harmony (technically melody 2) in this one, which comes in around 50 seconds to the end, or 30 seconds into this recording.


Recording 12: edited dynamics, added code to randomly remove 0-2 notes from each chord; I didn’t like the melody of this one as much, but I liked the chord progression


Recording 13: added more editing on the chords; one of my favorites!


Recording 14: just another example (split into 2 because too long)


Closing thoughts:

Like I brought up earlier, this project was definitely about striking a balance between true randomness and creating a piece that sounded good. I definitely think that choosing a lofi piece (rather than sticking with a more traditional/classical genre) made it easier to have randomness, since there was more freedom for the melodies and the chord progressions. Overall, the piece is far from random — it has my style/traces all over it in the choices that I made (for example, the rules for the chords, or the rhythm durations for each instrument).

Extensions

There were a few things I wanted to do that I either couldn’t figure out or ran out of time for/decided not to prioritize:

  • using Markov chains: I was debating whether or not to use Markov chains (specifically, ShannonFinger, which is part of MathLib) from the beginning. My initial reluctance was because ShannonFinger is based off of some sort of data that you input, so whatever the product turned out to be would be very similar to the data I chose (and I didn’t want that — I wanted something entirely new/more unique). However, if I had more time, I think it could be beneficial (melodically) to use ShannonFinger for the melody and the harmony to make it sound more like real music — the only problem is that I would have to figure out how to use that while still keeping the notes primarily in that measure’s chords.
  • fade effect: I wanted to figure out how to make the volume of a Synth fade without having to create a near-identical Synth where I edited the \amp. I tried creating a SynthDef (in fact, this is where my “dynamic” SynthDef originated), but couldn’t figure out how to change the argument in the midst of applying the effect to a sound (i.e. Pseq didn’t work like it does in Pbind). I also tried to figure out if I could apply an FX synth to the middle of another synth (nope), and even tried using CmdPeriod.run to completely break off the sound (but that threw errors).
  • figuring out more randomness in terms of structure of the piece
  • continue to clean up the sound of the instruments
  • opening & closing ambience: a lot of the lofi pieces I listened to had atmospheric noises (air, creaking doors, etc.) in the beginnings and ends that I really liked. A SynthDef to make a creaking door sound or a rain sound would be an interesting project
    • in a similar vein, some of the pieces I heard had sort of “shimmering” sounds that would be interesting to try to replicate in SuperCollider

First MIDI project!

Initial Ideas

My initial idea for this song—like all great ideas—started in the shower. I was jamming out in my head to a minor descending bass line in 7/8, and immediately I knew where my project would start. Soon after, I sat down with a synth app on my iPad (Synth One and Flynth are great, for those interested), and started to solidify my ideas. Music theory is pretty new to me, so it took me a little while to harmonize everything. Knowing I wanted the bass line to follow the classic 1 – 7(♭) – 6♮- 6(♭) – 5, I ended up with the minor progression: i – v6 – V6 / VII – VI – V. While I had initially imagined everything with jazz instrumentation, I eventually settled on a more electronic/”synthy” vibe. This was perhaps simply a product of the tools I was using to practice, but no matter. I created a new waveform project and set to work.

Flynth Additive Synthesizer App for iPad
AudioKit Synth One app for iPad

Meet MIDI!

The addition of MIDI to my composition toolkit immediately proved indispensable. I know it’s quite rudimentary, but it was really nice to be able bring my own musical ideas to fruition, rather than just mixing loops. I don’t have any sort of MIDI controller, so I tried to hook up my iPad as keyboard I could play. While I found a solution that works with Logic Pro, I couldn’t get anything to work with Waveform. Ultimately, I resorted to penciling in notes with Waveform’s built in MIDI editor. I found it useful to open clips in a separate window instead of using in-line track editor, which can be achieved by pressing the “pop out window” button on the top left of any MIDI clip. Here’s an example of what I was working with:

Waveform’s MIDI editor, with notes created via the pencil tool

Challenges with Synthesis

Ironically, however, the freedom of MIDI resulted in my biggest challenge with the project. I found it really difficult to accurately produce a sound I imagined with additive synthesis. Every time I wanted to introduce a new voice or instrument, I’d have a good idea of the sound I wanted, but had a lot of trouble translating that into the correct oscillator, filter, and LFO settings. I tried to combat this challenge with practice. I spent a lot of time with 4OSC and Subtractive, as well as the iPad apps mentioned above, simply jumping around presets, looking through how the sound was made, and tweaking things to see how each setting affected the instrument as a whole. (A few times, I found a sound I really liked on the iPad, but couldn’t easily translate it to 40SC or Subtractive because the interfaces are so different. Eventually I gave up on the non-Waveform synths from this frustration, even though they were quite convenient.) While I’d still say I’m far from comfortable, I’ve definitely started to get better—especially in 4OSC’s simple interface. At a few points, I was strongly tempted to look into virtual instruments, but I thought I’d leave that for my next project.

An example of a 4OSC sound I liked during this process

Digging into Composition

Pre-chorus, Chorus, and Rhythm/Meter Decisions

After what felt like a steep upfront time cost of getting my bearings in the world of MIDI, I was finally ready to start realizing the song I wanted to create. I started with a pre-chorus/chorus combo which followed the chord progression I had decided on earlier. I decided I wanted the odd meter of the chorus to stick out a bit more, so I wrote the rest of the song in 4/4, while in the chorus inserting an extra bar of 8/8 after every 3 of 7/8 to blend the worlds a little bit. In doing this, I signed myself up for the difficult task of convincingly transitioning between these two meters. After a few different approaches, I ended up using an isolated and syncopated pattern in the bass to erase some of the 4/4 context before entering the chorus.

On the left, the pre-chorus (4/4), and on the right the chorus (3x 7/8 + 1x 8/8), joined by a bar of syncopated 7/8 in the middle.
A snapshot of my tempo track, which required a lot of meter markers.
Meter changes can be added by clicking on your track BPM, then selecting “Insert Tempo Change at Cursor” in the properties panel.

Verses

Eventually, I realized that I had put a lot of attention into the middle of my song, without really thinking about how I wanted it to start. Since I was decidedly working in the world of 4/4 for the intro and verses, I thought it would be the right time to incorporate some loops. After quite a while sifting through Waveform’s search tool (something I would highly recommend, as it automatically adjusts to your tempo and key during preview) I came upon some pad, bass, and drum loops from Garage Band’s libraries that had a cool minor vibe. These went together quite easily, and with the addition of a buzzy synth melody I wrote in MIDI, I had the verse section.

The verse section in my track, made mostly of loops

Intro

Even as I tried to gradually layer tracks at the start of the verse, the start to the song was a bit abrupt. After trying a few different things, I decided to ease into the track with a smooth piano progression. One of the loops I had been using had a bass line that followed 1 – 6(♭) – 3(♭) – 1, which inspired the progression minor: i6 – iv – vii°6 – i. With a few suspensions and funky notes for some added spice, I ended up with something I liked. In order to transition in the verse, I used a sinusoidal AM LFO in 4OSC to add vibrato to the final i chord at the 1/16 note level (using the “sync” option in 4OSC). I used automation to gradually increase the depth of this effect at the end of the piano intro. This transition allowed me to play the chords at a bit slower of a tempo (80BPM), and use the 1/16 notes created by the LFO to establish the main 100BPM pulse. I though it all ended up sounding pretty cool, so I decided to use the vibrato sound as a pad throughout the entire piece to provide some unity.

Intro chords with AM LFO automation for vibrato

With another verse, an amped up prechorus using the lead instrument instead of lowpass keys, and a solo/chorus section, the content of the song was complete!

Edits and mixing

However, I had quite a ways to go before finishing. There were still several glaring issues with the track. First, I was having some trouble with the synthesis of my lead instrument: whenever multiple notes were playing, it seemed like they would cancel out and switch between each other. I spent a good while fussing with distortion, unison, detuning, and phase, as I suspected these were all culprits of some sort of phase cancellation between notes. I felt pretty stupid when I realized I just had the “mono” toggle on. To some relief, I did end up having to change the aforementioned settings as well, as the distortion and detuning didn’t sound great in a chord. The song then lacked some grunge, so ended up splitting my lead midi clips into two tracks: one with extra distortion and detuning for one note at a time, and another with less for multiple notes at a time.

Chorus clips split into two tracks

Second, even during later edits, the chorus didn’t sound nearly as full as the verses, and their overall vibes didn’t really match. This was one of my most difficult obstacles, stemming from how the piece was composed. Looking back, I think it would have served me much better to have planned out the entire song before jumping into the DAW. Writing the choruses before really knowing where I wanted to take the rest of the song resulted in somewhat disparate sections instead of a unified progression. Despite the deep roots of this issue, there were a few things I tried to help the chorus fit the vibe of the rest of the song. I added an extra ascending pad, panned different sounds left and right to spread everything out, messed with the different levels of all the instruments, and boosted the lows of the bass. These all helped the chorus sound a bit more full, and more in place.  I ended up putting a lot of automation on the oscilating pad, boosting it when isolated, and lowering it when layered with other sounds to keep the overall amplitude in check. One particularly fun edit in this phase was adding automation to the panning of an arpeggiated loop in the verse to make it feel like it was cycling around. It ended up looking something like this:

Takeaways

Overall, I really enjoyed working on this project. Music production is something that still feels incredibly out of my comfort zone, but I think for that reason I’m starting to have a lot of fun with it. I certainly still feel like there are several things wrong with my piece that I just don’t know how to fix, but just as often am I frustrated, I become excited with what have been noticeable improvements in my skills. Suffice to say, I’ve been having a great time learning more about music production. I’m particularly looking forward to branching out to less “electronic” sounds in my next project.

Here’s the final track!

My Reverberating Waveform Project

Due to technical difficulties, I am unable to post on the course blog. Instead, I wrote my blog on a google document you can access here:

https://docs.google.com/document/d/1S1Ewt3FyhMPvJ6ZOQ2pzAAWNEgZuVPylrNsLvfLKPko/edit?usp=sharing

I am very sorry for the inconvenience.

Samsung Galaxy Note 9

Samsung’s Galaxy Note 9 has two microphones: one at the top of the phone and another at the bottom of the phone. However, Samsung’s default Sound Recorder app was only capable of recording using one microphone instead of both. Unfortunately, the sample rate and the bit depth of the phone’s microphone was unable to be detected. However, when RecForge to record audio, I was able to use the settings to record at at 48khz at bit rate of 24, thus it is assumed that the Galaxy Note 9 have at least these specifications.

Audio recording apps that I had tried to use included Samsung’s default voice recorder, True voice recorder, and finally RecForge. As mentioned above, Samsung’s default application only utilized one of the speakers. It was determined that, after doing a mic-covering test individually on each mic, that the application only used the bottom mic. A similar test was conducted on True Voice Recorder. Though this application allowed me to adjust the Audio Gain, it nonetheless only recorded through one microphone. RecForge, however, was able to utilize both top and both microphones on the phone, which I tested by moving the phone above and below a sound source and tested if playback matched the anticipated movements.


Audacity was used to generate both sounds. The 15 second rising pitch from 100 Hz to 18 kHz was was accomplished by using Audacity -> Generate -> Chirp function. The 15 second white noise was generated by navigating to Audacity -> Generate -> Noise -> White Noise.


My computer, the 2019 Razer Blade Stealth, had stereo speakers with a speaker to each side of the keyboard. When recording the sound onto my computer, I placed the phone just above the middle of the keyboard, equidistant from each speaker. The phone’s top speaker faced the left side, while the phone’s bottom speaker faced the right side. It should be noted that this orientation should not have affected the sound much, as the sounds generated on Audacity were both mono.


After recording the audio on my Galaxy Note 9 using RecForge in the .wav format, I emailed the files directly to myself and downloaded them onto my Razer Blade Stealth for analysis.

FFT analysis of original 100Hz-18kHz sound file
FFT analysis of recorded 100Hz-18kHz sound file


From the two illustrations above, we see that the compared to the original file, the the recorded audio file had less amplitude, with the former maxing out at -12.5 dB and the latter at -24.5 dB (higher decibel = louder). In addition, we also see the maximum amplitude of the original audio file occurs at 150Hz, while the maximum amplitude of the original recording recorded a maximum amplitude at 600 Hz. This data seems to suggest one, or a combination, of three possible conclusions

  1. The Galaxy Note 9 microphone is more sensitive to higher frequencies that is it to lower freqencies
  2. The Razer Blade Stealth’s speakers are better at projecting higher frequencies that is it at lower frequencies
  3. The medium (air) is better at transmitting Higher frequencies than lower frequencies

The third conclusion is least likely to be a factor, as-frequency sounds are generally better at traveling through medium that high-frequency sounds.

For further analysis of the potential cause of this difference, we now perform a side-by-side comparison of the white noises.

FFT analysis of original white noise file
FFT analysis of recorded white noise file


From analyzing the white noise graphs, we see that the peak amplitude on the original white noise graph was -28.9 dB, while the peak amplitude on the recorded white noise graph was at -44.2 dB. However, the frequencies at which the peak sound was heard are remarkably similar, at 365 Hz and 371 Hz respectively. Unfortunately, the lack of peak amplitude difference between the original and recorded audio presents us with no information that could help us diagnose which of the three hypotheses could be contributing to the difference in frequency of the maximum amplitude.


Another point of interest for us to analyze would be how distance between the microphones and the speaker changes the maximum amplitude and the frequency at which it was observed.

FFT at 4cm
FFT at 4cm
FFT at 8cm
FFT at 8cm
FFT at 12cm
FFT at 12cm
FFT at 16cm
FFT at 16cm


Above are the FFT analysis of the audio recordings on the Galaxy Note 9 at 4 different height above the computer keyboard (in the same orientation as described above). Their respective peak amplitude at corresponding frequencies are as follows: -26 dB at 7000 Hz, -34 dB at 4000 Hz, -25.3 dB at 7000 Hz, and -25.7 dB at 7000 Hz. After considering our 8cm test as an outlier (the dB and frequency are definite outliers compared to the other data points), there seems to be no correlation between distance from speakers, maximum dB, and maximum frequency. However, with respect to our original three hypothesis, this does indeed rule out the possibility that the different frequency observed is due to the medium: even with increases in medium distance, there did not seem to be any difference in frequency at which the maximum amplitude was recorded.


Overall, when comparing the first two graphs, I am convinced that the Galaxy Note 9 has quite a flat frequency response. In the first two graph comparison between the original audio recording and the recorded audio of the 100-18000Hz sine sound wave, the approximate shape of the two graphs were quite similar, with the only difference between the two being that the latter had greater inconsistencies (dips and ridges) in the peak decibel of each frequency. This is likely due to environmental interference, such as sound waves bouncing off the walls in my dorm room. In a future analysis, it would indeed be ideal to complete the experiment again in a sound-absorbing environment, such that it reduces the environmental effects on the sound waves picked up.

iPhone SE (2020) Recording Quality

I’m a big fan of the 2020 iPhone SE. It’s $399 and has pretty much anything a cell phone normie like myself could want. BUT: Do its audio recording capabilities stack up?

The specs

The SE has three mics – one at the top by the front-facing camera, and two at the bottom where the speakers are. The two mics at the bottom allow for stereo recording.

As it seems is the case with most iPhones, the SE’s sample rate is 48kHz and bit depth is 16 bit. I confirmed this by trying various sample rates and bit depths in the TwistWave Recorder app. The app said that the device didn’t support recording above 48 kHz, and although TwistWave supported 32-bit processing and export it didn’t indicate the possibility of 32-bit recording. I couldn’t find a specs list or website to confirm this, but it’s certain that 48 kHz and 16 bit are supported by the hardware.

Recording app

I’m using TwistWave Recorder (shout-out to Michael Lee for the rec!). There are options for lossless audio, disabling Audio Gain Control (see the “Enable iOS processing” toggle), and controlling bit depth and sample rate:

Testing the frequency response

In Audacity, I generated 15 seconds of a 100Hz to 18kHz sine sweep and 15 seconds of white noise. I played these from my computer speakers at max volume and recorded them on TwistWave Recorder on my phone, angling the dual mics at the bottom of the phone directly towards and in front of the computer speakers.

In Ocenaudio, I generated FFT analyses of the original and the recorded sine sweep and white noise samples. The FFT analysis shows us the dB FS of the spectra of the samples and the recordings, which we can interpret to evaluate the spectral flatness of the recordings. We’re looking to judge whether the iPhone mics have a flat response (the mic accurately reproduces the original sound, with even sensitivity to different frequency ranges) or a shaped response (the mic is more sensitive to some frequency ranges than others – ranges of higher dB FS indicate higher sensitivity). See this Shure webpage for more detailed info.

Compare the graphs and sound files for the sine sweep…

FFT analysis of the original sweep tone

FFT analysis of the recorded sweep tone


…And for the white noise…

FFT analysis of the original white noise


FFT analysis of the recorded white noise


Both of the original test audio files have pretty flat graphs, with a significant drop a bit below 20kHz (roughly the upper limit of human hearing). This drop is also reflected in the graphs of the iPhone recordings.

Qualitatively, it’s easy to see that the iPhone has a pretty bumpy frequency response, with a weaker sensitivity at the lowest range (0-100hZ), a peak around 1500hZ, a valley around 5000hZ, a peak around 7500hZ, another peak around 12000-15000hZ, a weaker response from 15000-17000hZ, and then the drop from 17000-20000hZ as mentioned above. This holds true for both the white noise and sine sweep recordings.

This makes a lot of sense when you consider the practical purpose of an iPhone microphone: transmitting the human voice at GREAT quality. The weakness at the lowest and highest ranges of human hearing make sense – those extreme ranges are not important in the vocal spectra and can’t be heard very well anyway.

1500hZ, which I mentioned has a peak on the frequency response, is pretty important for decoding the human voice. Vowels fall in 200-2000hZ and consonants in 2000-8000hZ:

Those higher frequencies around 12000-17000hZ are also pretty well taken care of by the iPhone, which is good for enabling a crisp/clear/punchy sound.

So we can’t say the SE mics have a totally flat response curve, but they’re darned good at capturing the human voice. And it’s a relatively cheap phone, and cheap is cool.

Computer Music in the Common Household: Koji Kondo

Do you remember the 8-bit tune of Super Mario Bros.? How could a few geometric waves chant such a unique melody that we still hum to ourselves after 35 years? We can look at the composer of the theme, Koji Kondo, as a pioneer in not only video game music, but also the art of computer music.

Koji Kondo, Composer of several Nintendo games, notably Mario and Zelda (Image source here)

Before the (now-retro) video games began to lurk the grounds in the late 70s to early 80s, computer music was indeed an emerging field. However, this new music form was not much entertainment as it was a research field. One could see figures like John Larry Kelly, Jr. and Max Matthews as the Einsteins of computer music. In 1924, the famous theremin was invented. This instrument is known for delivering the sonorous pitches that could be changed by the movement of your hand. Composers often used it with orchestras and concert bands. The instrument was featured notably in the sci-fi film The Day The Earth Stood Still by Bernard Hermann in 1951. In the 1970s, artists like Herbie Hancock and Stevie Wonder incorporated other rudimentary electronic instruments into their songs, such as Chameleon and Superstition, respectively. However, at least in the 70s, this tech was usually performed alongside real instruments, or with singing. Other famous musicians used the innovative electronic instruments only for backing tracks. So how did pure computer music migrate from less prominent use in the 60s to the forefront of today’s entertainment?

Video game music contributed to the rise of computer music popularity. In the late 1970s to the 1980s, the video game industry took shape. Games of Nintendo were inspired by someone fiddling with a calculator at a train station. From this basis for their games, how were the “Nintenders” going to create visuals and sounds with an 8-bit microprocessor, limited picture-processing, and two kilobytes of RAM?

Koji Kondo in his office during the early days of Nintendo (Image source here)

Along came Koji Kondo. He had experience playing on a CS-30 synthesizer, and these skills were transferable into the realm of Nintendo. He explains in a 2001 interview, “Back then, there was no MIDI or other protocol that could directly convert your keyboard playing to data. Everything was composed directly on the computer, entering notes manually.” Kondo follows that he played melodies at home on an Electone organ and entered his arrangements on a computer in the Nintendo quarters. He introduced his Overworld Theme of Super Mario Bros. in 1985.

For Mario, Kondo initially focused on the pixelated but vibrant scenery of the levels. However, once he saw the game being played in real time, the fledgling composer felt the music should focus on the pacing of the game itself. He wanted it to match with our protagonist plumber’s actions, like his running, jumping, and his interactions with enemies and items. Many times Kondo wrote a piece, many times he would scrap it. He eventually pumped out six themes, including the famous signature theme, the waltz of the water levels, and the ominous Jaws-like jingle of the castle levels.

His next game was The Legend Of Zelda, released in 1986. For this game, Kondo originally wanted to use the classical piece Bolero by Maurice Ravel as the main theme. However, he had to scrap that idea since the piece wasn’t in the public domain. Instead, he created the majestic, otherworldly theme for the game that would spawn another popular fantasy series. (He did all this in under a day!) Modern composer and music theorist Andrew Schartmann praised the score of Zelda for how it blends elements of “Gregorian chant, rustic folk, and Hollywood fantasy.”

The Legend of Zelda theme illustrated with geometric waves

Kondo says he aims to emphasize “the experience for the player”, and this stays true in his work. The games, along with their 8-bit themes, made their way into common households. Players of the 1980s were exposed to a lively, virtual world. The digital display of the minimalist setting on the Famicom, the unique tune produced from square waves (“richer in harmonic content”, as mentioned by Kondo), all immersing the player in the game. Kondo is not hailed as a direct influence on computer music as a research field, but thanks to his iconic contributions, computer music in games has become part of everyday life for many. 

The scores of Mario and Zelda indicate how versatile Kondo is with a keyboard the size of a hand. To us, such a little keyboard may look like an impediment. Perhaps by not focusing on instruments themselves, Kondo was able to channel energy to melody. Perhaps this is a new form of musical expression. Was the lack of technology for Nintendo really a restriction, or was it a blessing in disguise? Should we work with limitations without knowing how limitations may help us? 

Mario theme adapted into orchestral arrangement

Information Sources:

Electronic Gaming Monthly. “Interview with Koji Kondo (Electronic Gaming Monthly – December 2005).” Square Enix Music Online, Dec. 2005, www.squareenixmusic.com/composers/kondo/dec05interview.shtml.

Hsu, Hua, et al. “How Video Games Changed Popular Music.” The New Yorker, 30 June 2015, www.newyorker.com/culture/cultural-comment/how-video-games-changed-popular-music.

Jobst, Merlin. It’s the Music That Makes The Legend of Zelda So Extraordinary, 11 Nov. 2015, 2:10pm, www.vice.com/en_us/article/jmakxy/its-music-that-makes-nintendos-the-legend-of-zelda-series-so-extraordinary-330.

Kohler, Chris. “VGL: Koji Kondo Interview.” Wired, Conde Nast, 5 June 2017, www.wired.com/2007/03/vgl-koji-kondo-/.

“Koji Kondo – 2001 Composer Interview.” Shmuplations.com, Game Maestro Vol. 3, 1 May 2001, shmuplations.com/kojikondo/.

Otero, Jose. “A Music Trivia Tour with Nintendo’s Koji Kondo.” IGN, IGN, 24 Oct. 2017, www.ign.com/articles/2014/12/10/a-music-trivia-tour-with-nintendos-koji-kondo.

Centro Latinoamericano de Altos Estudios Musicales (CLAEM) Electronic Music Laboratory

In any analysis of the history of computer music in the global technological revolution of the late 20th century, it is imperative to include the Centro Latinoamericano de Altos Estudios Musicales (CLAEM), a music laboratory established in the Instituto Torcuato Di Tella in Buenos Aires, Argentina. This space for musical collaboration across countries and disciplines, founded in 1963, was an early pioneer of the Latin American electroacoustic sound landscape. Throughout its short-lived eight years from 1964 to 1971, the laboratory left a large mark on musical history and produced some of the most influential and beautiful electronic tapes. 

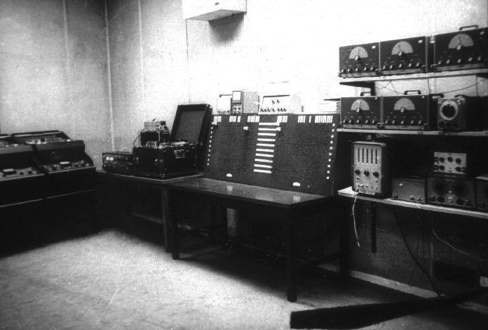
The CLAEM Electronic Music Laboratory, 1964.

Funded by the Rockefeller Foundation and directed by Argentine composer Alberto Ginastera, the CLAEM served as the pinnacle of the transnational world of contemporary music-making, as its main focus was collaboration between composers and students from Latin America and Europe. Musicians came to the CLAEM from far and wide to learn and exchange ideas with some of the most influential and passionate composers of the time. Its impressive roster included Oliver Messiaen, Aaron Copland, Iannis Xenakis, Luigi Dallapiccola, Mario Davidovsky, Luis de Pablo, Bruno Maderna, and Eric Salzman, among others. The first tape piece produced at this laboratory in 1964 was Intensidad y Altura, which translates to “Intensity and Altitude,” created by Peruvian composer César Bolaños. Music composed at this institution reflected the diversity of musicians and composers that collaborated with each other – a wide spectrum of approaches, including serialism, sound-mass compositions, aleatoric and indeterminate operations, mobile forms, live improvisation, graphic notations, and electronic and musique concréte techniques were all employed to generate computer music. These works were all produced at the well-equipped electroacoustic studio called Laboratorio de música electrónica (Electronic Music Laboratory), and this studio became the training center for more than 50 composers representing their Latin American countries of origin: Argentina, Bolivia, Brazil, Colombia, Costa Rica, Chile, Ecuador, Guatemala, Mexico, Peru, Puerto Rico, and Uruguay. The studio was modeled after the Columbia-Princeton Electronic Music Center, a recording studio that many composers had also gone on to train and produce music in. CLAEM soon became known for its legacy as a training ground for a significant generation of Latin American composers, who each played important roles in the global music industry.

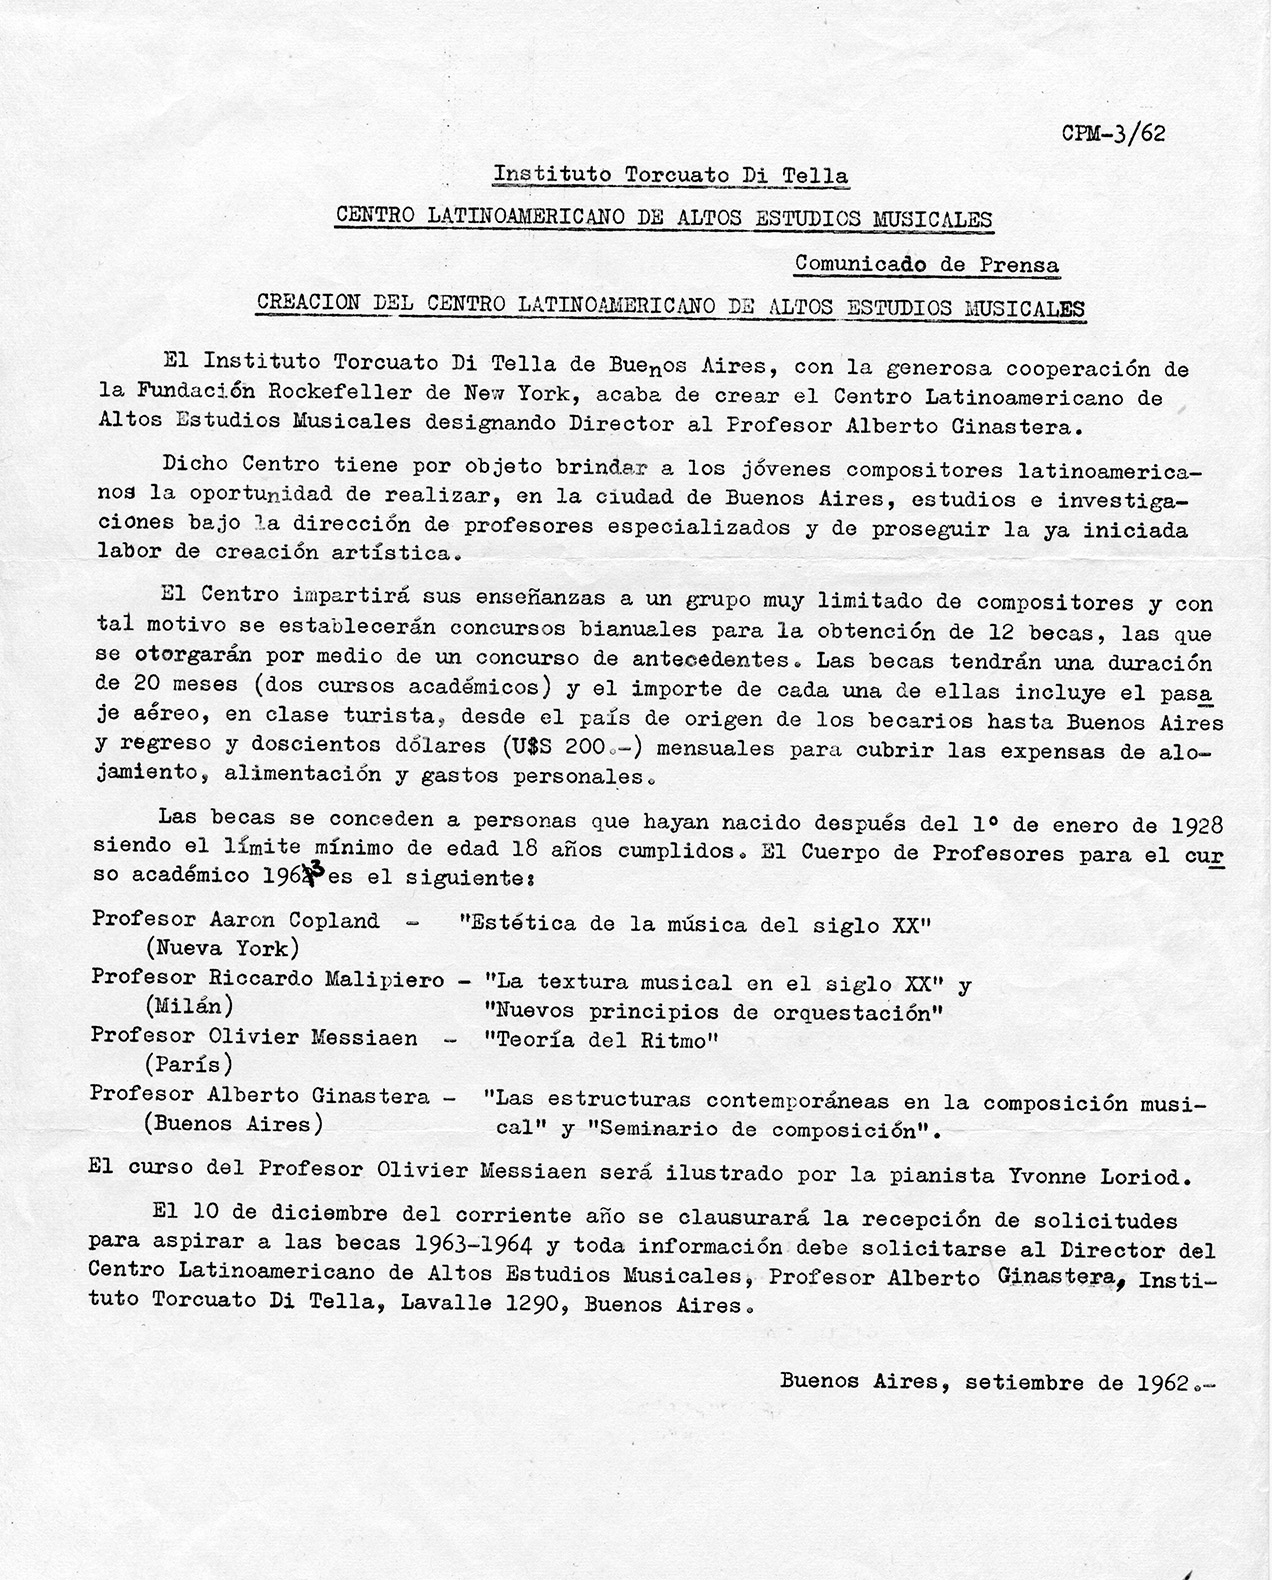
CLAEM press release, September 1962.

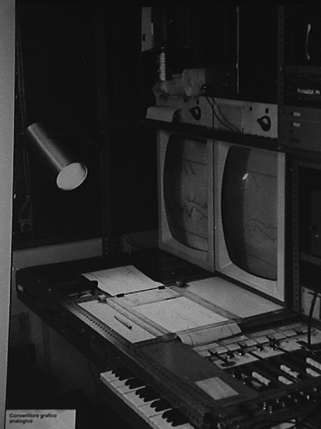
In the 60s, Fernando von Reichenbach became the center’s technical director, and his musical inventions first utilized by CLEAM are now starting to gain international recognition for their impact on the history of computer music. He invented the Convertidor Gráfico Analógico, or Analog Graphic Convertor, which converted graphic scores from a paper roll into electronic control signals adapted to work with analog instruments. The first piece created using this device, also known as the “Catalina,” was Analogías Paraboloides by Pedro Caryeveschi in 1970. Other device inventions of his include the keyboard-controlled octave filter and a special patch-bay that helped solve complex problems at the lab. He was most revered, however, for his redesign of the laboratory in 1966, where he was praised for knowing how to maximize the efficiency of the space for composers and was hailed as “ingeniero” by his co-workers.

Redesigned CLAEM laboratory by von Reichenbach in 1966.
Analog Graphic Convertor.


Another important historical event that influenced the music created by the CLAEM were the political conditions of Argentina in the 1960s. The de facto presidency of Juan Carlos Onganía in 1966 emphasized government censorship of theater and the visual arts. Composers therefore worked under fear of suppression, and officials frequently closed the building that the CLAEM was housed in due to controversial arts presentations. The Laboratorio saw its peak activity in the second half of the 1960s, and the military paid little attention to the music written at CLAEM, CLAEM musicians were still victims of repression at times. Ginastera’s Bomarzo and Gabriel BrnÄic’s ¡Volveremos a las montañas! followed by his arrest and torture were hallmarks of political instability – leading the center to close in 1971 in part due to political pressure. 

The most successful electroacoustic composition at CLAEM was actually its first production: Intensidad y Altura by Peruvian composer César Bolaños, who studied electronics at the R.C.A. Institute from 1960 to 1963. He led a two-year fellowship, where he taught at the laboratory in 1965-66. He stayed at the center longer than any other student, writing electronic music for the choreographies of Jorgelina Martínez D’Or and other audio-visual entertainment. Bolaños wrote Intensidad y Altura based on the poem of the same name by Peruvian writer César Vallejo. The composer made use of the limited functioning equipment at the laboratory, musique concréte techniques with electronically generated and processed sounds. The piece continues to be played at festivals today.

The CLAEM provided a special institutional experience that deserves to be documented in world-wide computer music history, as it sowed the seeds of a strong tradition of composers across the south of Latin America, and although it was open for a relatively short period of time, the legendary studio is a memorable beacon for the Latin American avant-garde.

SOURCES:

“About the History of Music and Technology in Latin America | RICARDO DAL FARRA | Art + New Media in Latin America.” Accessed September 9, 2020. https://mediaartlatinamerica.interartive.org/2016/12/history-music-technology-latinoamerica.

HERRERA, E. (2018). Electroacoustic music at CLAEM: A pioneer studio in latin america. Journal of the Society for American Music, 12(2), 179-212. doi:http://dx.doi.org/10.1017/S1752196318000056

“Ricardo Dal Farra : Latin American Electroacoustic Music Collection.” Accessed September 10, 2020. https://www.fondation-langlois.org/html/e/page.php?NumPage=546.
“Centro Latinamericano de Altos Estudios Musicales (CLAEM) press release,” Cook Music Library Digital Exhibitions, accessed September 10, 2020, http://collections.libraries.indiana.edu/cookmusiclibrary/items/show/47.